Learn Blackjack Strategy Chart


A Blackjack Strategy Chart is a grid that shows the best statistical move in every possible hand combination based on the player’s cards and the dealer’s visible card. It tells players when to Hit, Stand, Double Down, Split, or Surrender to minimize the house edge. Using a strategy chart correctly can reduce the house edge to under 1%.
I’ve heard from loads of beginners who grabbed a blackjack strategy chart, rolled into a casino, and got lucky for a few hands. Sure, occasionally you’ll have a good run and take home a bit of money. But let’s be real: relying on basic strategy alone usually isn’t enough to beat the house in the long haul. Think of basic strategy like an airplane’s wheels—it helps you get down the runway, but you still need wings (like card counting and other techniques) to actually fly. If you’re gunning for real profits and want to see green more often than red, you’ll eventually have to explore stuff like counting, special plays (often called “index plays”), and clever betting tactics. But let’s not get ahead of ourselves—start with the fundamentals first.
What is a Blackjack Strategy Chart?
A blackjack strategy chart, also known as a blackjack cheat sheet, is a visual representation outlining the optimal moves a player should make based on their hand and the dealer’s upcard. Using this chart can significantly increase your chances of winning by reducing the house edge and minimizing costly mistakes, as well as improving your blackjack strategy.
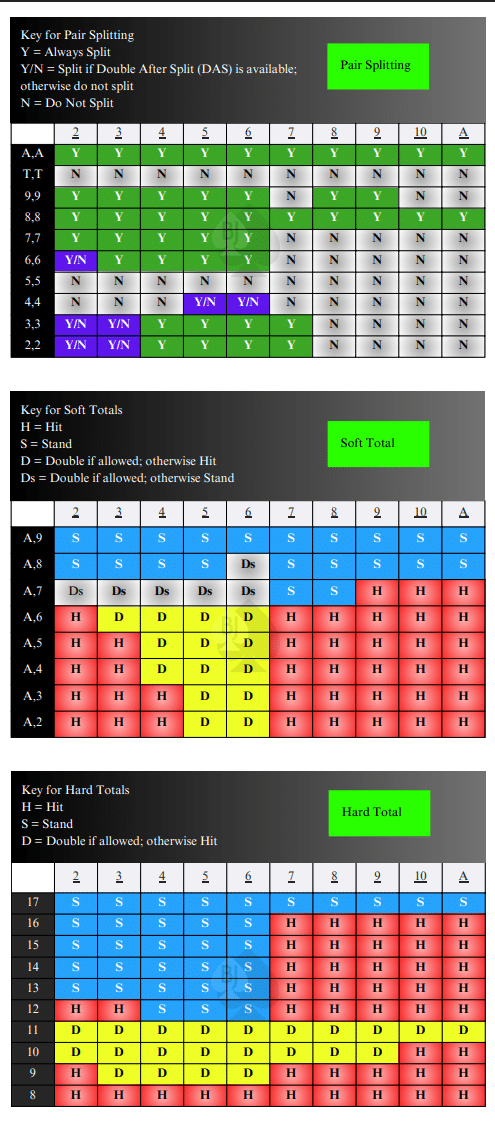
How to Read a Blackjack Strategy Chart
Understanding how to use this chart effectively is key. Typically, blackjack strategy charts use abbreviations like:
- H: Hit
- S: Stand
- D: Double Down
- SP: Split
- SUR: Surrender (when allowed)
Players match their current hand vertically against the dealer’s card horizontally to find the recommended action.
Basic Blackjack Strategy Chart Decisions
Below, I’ll try to phrase the guidelines in a way that feels natural rather than just bullet points you’d see on a cheat sheet. Keep in mind that subtle differences in table rules can affect these recommendations.
Soft Totals (Ace is counted as 11 initially)
- A,9 (which totals 20)– Stay where you are. You have a strong hand.
- A,8 (19)—Double against a 6; otherwise, stand.
- A,7 (18)—If the dealer looks weak (2–6), double; if the dealer shows 9, 10, or Ace, you usually hit; otherwise, you stand.
- A,6 (17)—Double on a dealer 3–6; otherwise hit.
- A,5 (16)—Double on a dealer 4–6; otherwise, hit.
- A,4 (15)—Double on a dealer 4–6; otherwise, hit.
- A,3 (14)—Double if the dealer has 5 or 6; otherwise, hit.
- A,2 (13)—Double if the dealer has 5 or 6; otherwise, hit.
Hard Totals (No usable Ace or Ace must count as 1)
- 17 or higher—Always stand.
- 16—Stand if the dealer shows 2–6; otherwise, hit.
- 15—Stand if the dealer shows 2–6; otherwise, hit.
- 14—Stand if the dealer shows 2–6; otherwise, hit.
- 13—Stand if the dealer shows 2–6; otherwise, hit.
- 12—Stand if the dealer shows 4–6; otherwise, hit.
- 11—Always double.
- 10—Double if the dealer has 2–9; otherwise, hit.
- 9—Double if the dealer shows 3–6; otherwise, hit.
- 8 or less—Hit without hesitation.
Pairs (Splitting)
- Aces—Always break ’em up.
- Tens—Don’t split them. You have 20 already—stick with it.
- Pair of 9s—Split against 2 through 9 (except 7); otherwise, stand.
- Pair of 8s—Split every time. 16 is a tough spot, soit’s better to try for two separate hands.
- Pair of 7s—Split against 2 through 7, or just hit if the dealer’s stronger.
- Pair of 6s—Split them if the dealer shows 2 through 6; otherwise, hit.
- Pair of 5s—Usually, you double down on 5 + 5 if the dealer’s showing 2 to 9. Otherwise, just hit.
- Pair of 4s—Split only if the dealer’s weak (say, showing 5 or 6). Otherwise, hit.
- Pair of 3s—Split if the dealer has 2 through 7; if the dealer’s strong, you just hit.
- Pair of 2s—Split if the dealer shows 2 through 7; otherwise, take a hit.
Surrender Guidelines
- If you hold 16 and the dealer has 9, 10, or Ace, you usually surrender (if the option exists). Otherwise, follow the usual plan for a “hard total” of 16.
- If you have 15 and the dealer shows 10, you typically surrender. Otherwise, keep playing.
Benefits of Using Blackjack Strategy Charts
- Improved odds: Blackjack charts can reduce the casino’s advantage significantly.
- Easy decision-making: Eliminates confusion, ensuring quicker and smarter play.
- Consistency: Helps maintain discipline and a consistent betting strategy.
Your Strategy Might Change Depending on the Table
Let’s say you’ve memorized a handy chart for a specific set of rules—awesome! But each table you visit might have different policies: some offer surrender, some make the dealer hit on a soft 17, and some don’t. That can shift the logic behind the blackjack strategy chart. So, once you’re comfortable with a standard version, be prepared to tweak your play to fit the specific rules you run into. Every detail matters in blackjack, especially if you want to nudge that advantage as close to zero (or positive) as possible.
You Gotta Know This Stuff Cold
From my own mistakes, I’ve learned that “sort of knowing” a strategy chart can cost you real cash. One time, I lost track of whether I should double my 11 against a dealer’s 10 because I was distracted by a cocktail waitress—boom, that mix-up cost me a bunch of chips. So, trust me when I say you need to know your moves backward, forward, and sideways. If you only “kind of” memorize it, your mind can go blank under casino lights, especially if the dealer’s flipping cards at breakneck speed.
FAQs
1. Are there different blackjack strategy charts?
Yes, there are. Charts can vary because some are created with specific conditions in mind, like a single-deck game or a dealer who must stand on any soft 17. My suggestion? Learn a reliable “all-around” chart first, and then add variations once you know which type of table rules you usually face. If you try to memorize ten different charts right away, you might jumble everything up in your head—trust me, I’ve been there.
2. How do I actually memorize this?
There’s no magic wand for committing all these moves to memory. I found that printing out a blank template and filling it in from scratch every day for a couple of weeks did wonders for me. Another tip is to simulate real casino distractions at home—turn on music, maybe have a conversation going in the background—so you learn to keep your focus. You can also do flashcards: one side with a player’s total and a dealer’s up-card, the other side with the right move. If you flub it, do it again.
3. I only missed one move in 200 hands—Is that good enough?
Honestly, if you’re missing even one or two decisions every few hundred hands in a calm, quiet practice setting, you might miss a few more than that when you’re dealing with actual casino energy—especially if the dealer is flying through the decks or you’re chatting with other players. Believe me, I’ve misread my own hand more than once when the game got hectic. If you’re aiming to really profit, you want to be nearly flawless before putting chips on the felt.
4. Is using a Blackjack Strategy Chart legal in casinos?
Yes! Using a strategy chart is completely legal as long as you’re not using an electronic device or gaining information from someone else while playing. Many players even memorize the chart or use small cheat sheets.
5. Does a Blackjack Strategy Chart guarantee wins?
No chart can guarantee a win every hand, but it significantly improves your odds over time by helping you make the statistically best decisions in every scenario.
6. Can beginners use a Blackjack Strategy Chart?
Absolutely. Strategy charts are especially helpful for beginners, making it easier to learn optimal decisions without needing to memorize complex rules right away.
7. How much does a strategy chart improve your odds?
Using a strategy chart can reduce the house edge to as little as 0.5%, depending on the table rules. This is a significant improvement over playing without a strategy.